Back To School

•October 25, 2014 • Leave a Comment

An artist never stops learning. As soon as you do, you stop being creative. Creativity is about problem solving, it’s about doing something new. If you’re drawing or painting in the same way, using the same subject matter, you’re no longer being creative. You need to stretch, you need to feel uncomfortable, maybe even (gasp!) fail at what you’re doing a few times. If you are starting to feel like your art is coming easily then it’s time to go back to school.

Lately I have been unsatisfied with my work. I’ve felt stuck in a rut, doing the same thing over and over. My solution, get back to learning new techniques, use different materials, make new art, say something different. I am doing this by watching videos, looking at other artists work, reading artists blogs, then trying to incorporate their methods into my work, or even try to copy their work.

Some artists I’ve been looking at include Franz Kline ab-ex-ny-moma-1011-08-1

Mark Rothko Orange,_Red,_Yellow

Sam Francis _1738_2006xfss002

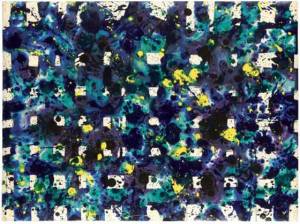
and more modern artists like Tom Dixon DixonOchre&BlueWithGrid

Gerhard Richter richter_img1

and Anselm Kiefer horlogium_kiefer.

I’ve enjoyed discovering artists I’ve not been aware of previously and it’s broadened and informed my own mark-making and palette. Some works I’ve viewed have invoked an initially negative response in my mind. I’ve thought “I don’t like that, I can’t do that, I would never express myself like that!” Those pieces are the ones I’ve learned the most from. Trying to understand the how and why of challenging art and then trying to use what I’ve learned in my own art has forced me to grow creatively and make art in a way I haven’t done since art school. It’s refreshing and tremendously satisfying.

Copy Cat Part Two

•October 11, 2014 • Leave a Comment

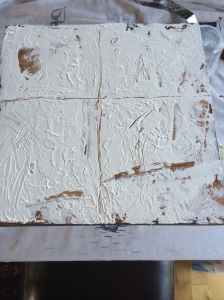
Well, my attempt at creating crackles was a flop! Maybe the modelling paste was not suitable for the task or maybe my glue wasn’t thick enough or I don’t know what. I guess I’ll have to get some crackle gel next time I’m near an art supply store. No matter, the textures on my painting are marvellous. I pealed a bit of the paint skin on the thick parts off and exposed some more text. I’ll take the piece further and make it my own from here.

IMG_1350

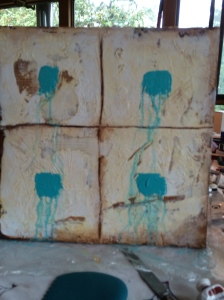
I am compelled to paint these little squares. I’m not sure why, I think they are interesting and provide a focus and another element to play with. I wanted to add some colour and incorporate it into the painting. I applied thick squares of paint with a palette knife, then sprayed them with water and let the colour bleed down the canvas.

IMG_1355

Experimenting further, I brushed on some more colour, this time red, filling in some of the texture to highlight it. Not sure if I like it but I’ll keep going. I’m going to work on this until it is satisfactory to me as a finished painting and not just an experiment. I think by resolving my exercises into completed works I can learn to problem solve issues that bother me (like the red I’m not sure of) with more confidence.

IMG_1360

I decided to tone down the red by glazing a translucent butter cream colour then scumbling with white.

IMG_1362

I repeated this process several times until I felt it luscious enough and subtle enough. Then I used my palette knife to paint on a rich, dark blue/green over the teal to provide some serious value contrast..

IMG_1363

It might be done. It certainly doesn’t resemble the piece by Cody Hooper that I was working from but I learned a great deal from the attempt.

•October 10, 2014 • Leave a Comment

Just wanted to share my Facebook page with anyone who finds my blog interesting.

https://www.facebook.com/pages/amy-heggie-art/213030189652

Copy Cat!!!

•October 9, 2014 • Leave a Comment

I have no problem with trying to ‘copy’ someone else’s art or use someone else’s idea. That’s if it’s done with the intention of learning something. Art students through the ages have copied the Master’s painting in an attempt to learn their techniques. I have found that when I try to copy something I end up becoming inspired to produce something all together different from the piece I am copying. Plus I learn to develop my own techniques by trial and error, the best way!

Right now I am trying to figure out how the artist Cody Hooper made the textures on his painting “Shape Shifter”. Here’s a video he posted on youtube highlighting those textures.

I’m starting by collaging some paper with printed text onto a canvas. Next I’m going to paint some dark brown around the edges and glaze the rest of the surface with the same colour.

This is the ground for the painting.

This is the ground for the painting.

The edges have been painted and a dark glaze applied.

The edges have been painted and a dark glaze applied.

I watched a youtube video about crackling. I don’t live anywhere near an art supply store and I needed to learn how to get this effect without using crackle gel. I want there to both deep and not so deep crackles. I’m going to try the method I saw which involves painting on white glue then applying the paint. Instead of just paint I am mixing moulding paste with white paint and I’m going to trowel it on. I have no idea if this is going to work, that’s the beauty of experimentation, it could work beautifully, it could fail miserably, or, it could be different than desired but something very cool none the less!

I brushed white glue on random places, them troweller on white paint/modelling paste.

I brushed white glue on random places, them trowelled on white paint/modelling paste.

I added some texture into the wet surface by scratching and scraping. I left some places free to see the text below.

Here’s the crackling demo video.

I’m going to let my canvas dry over-night. I’ll be back tomorrow with the results.

2014, a year of change.

•August 13, 2014 • Leave a Comment

This year, 2014, started off very roughly. Early in the year I found out I had cancer, shortly after that, my best friend’s son, Jordan, passed away.

Jordan’s memorial was such a gathering of community! So much love and sharing, so many people coming together to support the family and celebrate his life! He lived life to the fullest, he never compromised.

After having surgery to remove the tumour inside my body, I began to question just what it is I am doing with my life. I began to draw again but found it completely unsatisfactory. I decided to paint. I have always painted but had not committed myself to it. I used home-schooling my son as an excuse, I used anything as an excuse. Why? I think because painting involves my soul. It is exposure for me. It requires (gasp!) mistake making! For the past two months I have been painting like a fiend and have made many mistakes and have learned so much. I am in love with it! I love the mistakes as they require me to stretch and go places I wouldn’t have thought of.

My newest painting was supposed to be a polar bear. I had so much trouble with it that I scraped the canvas and instead painted a dark blue abstract with bright red squares diminishing in intensity toward the edges. It symbolized the polar moon and was very satisfying when finished.

Recently I participated in a showing of paintings with another artist and received many positive comments regarding my new work.


\10557328_10152206634217016_5122092708418640221_n


Finally! A New Drawing!

•September 18, 2013 • 1 Comment

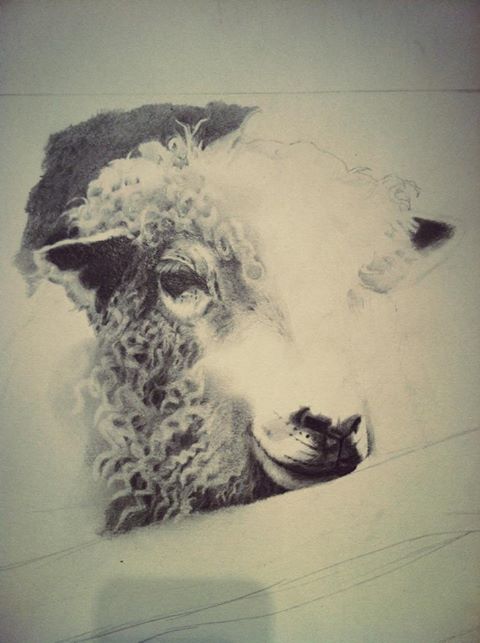
     I have finally found the inspiration and the creative drive to start a new drawing. I’ve been floundering for a while so this is a bit of a relief. I thought maybe I had lost it.

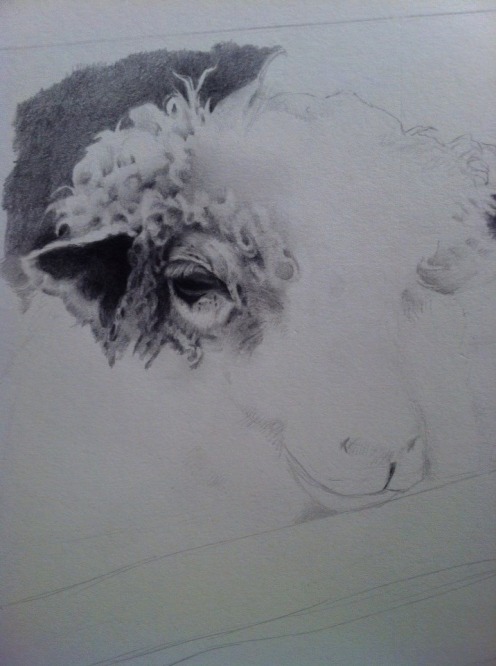
     I’m drawing a local Cotswold sheep. I’ve been taking photos of my progress so I’ll post them as I go.

Day One

Day One


Day Two

Day Two

Day Three

Day Three

Day Four

Day Four

18 Jan 2013

•January 19, 2013 • Leave a Comment

I am an artist. I live in a fantastical reality where even the most mundane objects, thoughts, words, sounds are multifaceted and filled with creative potential.
Here’s a challenge: look at an object, any thing will do. Draw it on a piece of paper, really think about your object and start to put some of those thoughts down as doodles on your drawing. Draw the letters of words that come to mind when you think of your object. Translate the sounds of those letters into colours and add them to your drawing. Use pencils, pens, markers, crayons, paints, whatever! Even collage!
When finished share them, post photos of them on social media, give them to friends, inspire others to play. This is just a beginning, just a warm-up for when you’re feeling uninspired. Enjoy!

Gradient Bars

•April 25, 2012 • Leave a Comment


Before doing any drawing it is a good idea to familiarize yourself with your drawing tools and practice some techniques. The mechanical pencil is great for drawing because it remains sharp, more or less. It will develop a small flat area which is good for shading. When you need it to be sharp, you can simply turn the pencil slightly and draw with the edge of that flat spot. It will be very sharp.

It takes a while to become comfortable with the mechanical pencil. A good exercise to do is to draw ‘gradient bars’.  Start by drawing a very faint rectangle about 1” x 2”. Using very small strokes with a slightly circular movement start at one end of the rectangle and shade from dark to light. Use very pale shading to start, go over and over it to get it darker. Try to hold the pencil very loosely, put very little pressure on the paper. After a while this will become more intuitive as you get the feel of it. Try this exercise with all the different leads you have i.e. 2B, HB, etc.

Drawing Skulls and Bone

•April 25, 2012 • 25 Comments

Drawing a skull or any complex item requires some time in setting up. It is important to measure while you sketch the outline of the skull so as to get the proportions correct. I don’t worry about things like eye sockets, little holes, etc. until later.

With this drawing of a deer skull, we will be adding a smooth tone to the blocked out line drawing before any details or shading begins. This gives a mid-value base to start from which can be added to with pencil or taken away from with a kneaded eraser.

When the blocked out skull is ready, take your 4B graphite stick and gently, evenly apply tone to the surface of the paper, keeping inside the boundaries of your drawing. Try to find a flat spot on your stick which will leave a wide trail of graphite. I find small, circular strokes work well, applying very little pressure. Then, with some tissue or paper towel, gently rub the graphite to produce an even tone.

At this point you can erase any graphite which got rubbed outside the lines of your blocking. Then you can add detail and shading with your HB and 2B pencils and remove tone with your kneaded eraser to create highlights.

Blocking Out a Drawing of a Small Complex Object

•April 25, 2012 • Leave a Comment

Drawing objects such as dragonflies or little beach crabs requires precise preparations. This should take some time. Careful blocking prevents all kinds of trouble down the road. There is nothing worse than drawing for hours, only to find your wings aren’t symmetrical, or your crab legs are too long or too short. What I am saying is it’s better to spend two hours blocking something out correctly than to have to erase five hours of drawing.

Firstly, decide how large you want your drawing to be. Let’s say you want to fill a piece of paper which is 10” x 10”. Measure the length and width of your object – I will use a dragonfly as an example. A dragonfly measuring 2” x 1.75” could be drawn four times its size to fit comfortably on the paper. That would make the drawing of the dragonfly 8” x 7”.  Start measuring, and multiplying those measurements by four, where the wings are on the body, the widths of each wing, the length of body segments, etc.With your HB pencil, make marks on the paper to note the enlarged length and width of the dragonfly.

A – length,  B – width,  C – bottom of head, D – top of wings, E – bottom of top wings,  F – bottom of abdomen,  G – Bottom of wings

Now you can lightly draw in the outline of your subject, taking care to continue measuring it’s various parts for accuracy. Make sure to look at your subject as you are drawing it. I can’t stress this enough! Not only should you examine the parts of the subject, but really look at how they relate to each other and the spaces between the parts. Once you have finished blocking you can begin your drawing confident that it is proportionally correct and you can then concentrate on the fun part of drawing.